Economy (Premium)
An in-depth guide on how to configure and run your economy system within Discord.
- Economy Introduction
- Configuring Categories for Economy
- Adding Items to Economy
- Adding Kits to Economy
- Adding Command Groups To Economy
- Adding Teleportation to Economy
- Setting Role Specific Economy Items & Kits
- Player Wallets, Balances, Rewards and Logs
Economy Introduction
Welcome to the Economy for VereTech, because this is a premium feature please allow us to extent our gratitude and say thank you for signing up to the project.
With the Economy you have the ability to hold a store within your Discord for all of your players to use.
Abilities from allowing daily or weekly claimable kits, to selling weapons, resources, ammo, literally anything - You even have the power to have a secret hidden store for VIPs which only VIP members will have the ability to view.
There are a number of ways you can have players earning that all important currency which you set, from earning through PvP & PvE kills, Claiming in-Discord events and ever our own Bandit Spin Wheel! As seen in Bandit Camp in-game!
All sales within the store have the ability to be instantly delivered or even have a delay of your choice!
Configuring Categories for Economy
Adding a Category
Before we start adding items and kits to the store we first need to give the bot some categories so that we have places to add our items. To do this we need to use the command /category add, this will give the option below;
The first option is selecting a name, this name can be whatever you want it to be, for the purpose of this document we will be calling our category KITS.
The other options we have are as follows;
position: These are whole numbers starting from 0 to set the order of the categories, eg - 0=1st, 1=2nd, 2=3rd and so on...
server-cooldown: Server cool downs will mean once someone claims an item from this category, no-one will be able to claim again until the stated time has elapsed - Timer is in seconds so 30 minutes will be - 1800
player-cooldown: Player cool downs will mean once someone claims an item from this category, they personally will not be able to claim again until the stated time has elapsed - Timer is in seconds so 30 minutes will be - 1800
Once you have set your parameters hit enter and the category will be created.
Editing a Category
If you've made a mistake or want to update the settings on a category then you can do so by using the command /category edit. Once you trigger this command you will be given a drop down menu showing all of your current categories, please select the one to edit and you will be shown the image below;
As you can see you have the options to give the category a new name, new position, new cool downs, simply click the one you wish to edit and change the input as necessary, hit enter and the settings will be applied.
Listing your Categories
If you forget what categories you have available, forget which one to edit or simply just want to see them all in a list you can use the command /category list which when send, will return a list of your categories, their positions and how many items you have inside that category, as shown below; 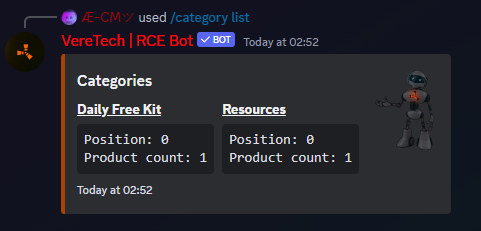
Deleting a Category
Should you require to remove a category then you can do so by using the command /category delete, from here you will be shown a list of you categories with one to choose from to delete, as shown below;
Simply choose your category and then hit enter. Please Note: If your category has items within when you delete then those items will be wiped also, recommended you check by clicking here on how to change an items category before deleting.
Adding Items to Economy
Adding Items to a Category
Welcome to the fun part of building your in Discord RCE store!
The first thing we are going to cover is how to add an item! Using the command /product add-item we can initiate the process of adding items into the store. As you will see in the image below, we have up to 12 customizable options, these aren't all mandatory except the initial 4 which are;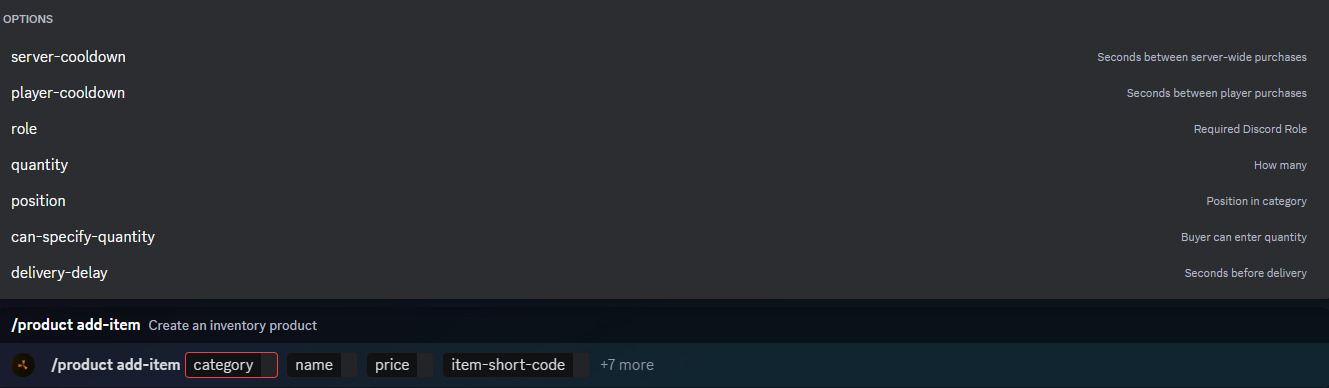
Mandatory Options
Category - Please select which category you wish for this item to be placed in.
Name - Please name the item - This is personalized and is not referring to the item name, if selling Metal Fragments in a bundle of 1,000 then maybe call it 1,000x Metal Fragments.
Price - You will need to price this item accordingly within your store.
Item-short-code - This will give you an extensive list of all items in the game, please start typing the name of the item and then click your option as it appears in the list. The bot will then code the item in using it's built in item-short-codes.
Optional Options
server-cooldown - You can specify that only one player can buy this and then a cool down timer is enabled at your required length. (Must be whole number and time is in seconds)
player-cooldown - You can specify after a player has purchased the item, how long he then has to wait to purchase it again, this will not affect any other players ability to buy this product. (Must be whole number and time is in seconds)
Quantity - By default the quantity will be 1, to set your chosen quantity then please click quantity and set your amount.
position - You can adjust the order in which these items appear in your store by clicking this menu, starting at 0
eg; 0=1st, 1=2nd, 2=3rd, 3=4th ect...
can-specify-quantity - Yes/No, players can specify if they want to buy multiple numbers of this product at once.
delivery-delay - You can specify how long after the item is purchased it takes to receive delivery, this can be extremely useful if they are experiencing a raid, it will stop them instantly sealing constantly using the shop to buy doors ect.
(Please enter whole numbers and time is in seconds).
Role - You can specify which Discord role is allowed to see this item. Please Note: Being the Discord owner does not give you automatic immunity to this rule, please ensure as owner you have every role available within your Discord.
Editing an Item
Should you require it, you also have the option to edit an item, you can do this using the command /product edit-item, using this command you will have the same options as before for editing, you will simply have to select which parameters you wish to edit, or even add. Please see the image below;
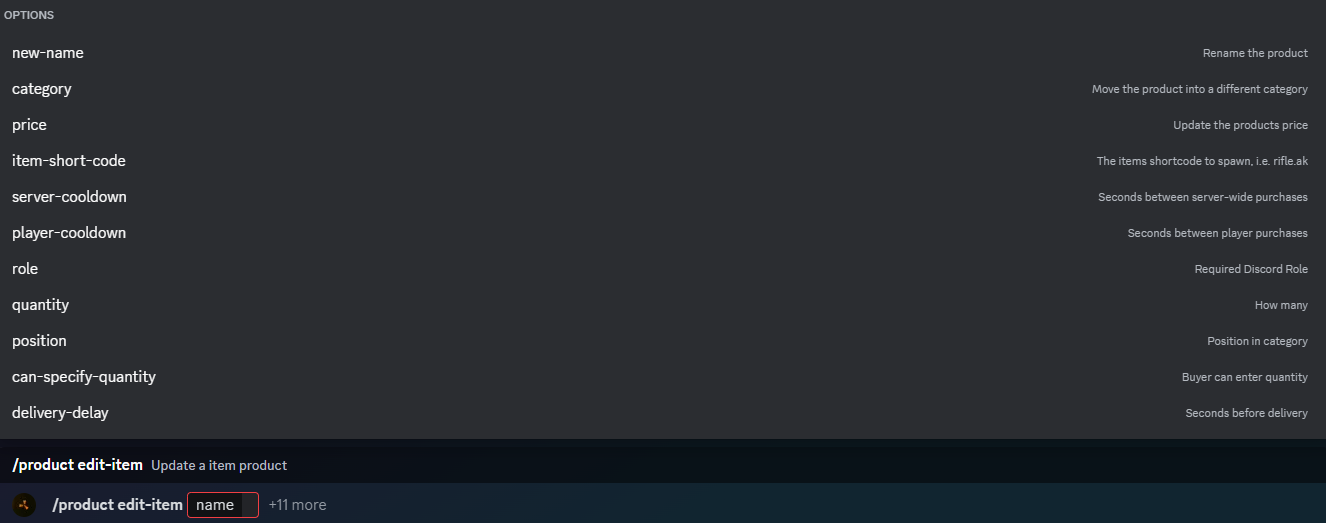
Obviously with editing, because the item exists inside your store, there are no longer "Mandatory" edits as it already has all the information it needs to be in your store.
Once the command is sent following any changes, you will receive the following response from the bot, please accept this as confirmation of your changes.
Clearing Cooldowns in Items
Following certain actions, for example wipes, there comes a time when we require a method to clear all cooldowns for products in the store. Using the command /eco clear-cooldown we can do this. Following triggering this command we have 2 options;
Category - Please select the category which you wish to clear the cooldowns from.
Product - Please select the category which you wish to clear the cooldowns from.
If you leave BOTH options BLANK - The entire shop will have all cooldowns wiped.
If you select CATEGORY and leave product BLANK, all items within that category will have cooldowns wiped.
If you select PRODUCT and leave category BLANK, Only the specified product will have cooldown wiped.
If you select BOTH, only the specified product will have cooldown wiped.

Deleting an Item
From time to time you may wish to mix up the contents of your shop, there are a number of ways to do this including removing items you no longer want there. To do this please use the command /product item-delete, this command will then send you a list of your products to select which one you want to delete, in the event you have too many items in the store, please start to type the name into the text box for it to shortlist with autocomplete. Please see the example below;
Once you select your item to delete, simply hit send and the bot will remove the item. You will be notified with a response acknowledging your request and it's success, below is the response to expect when deleting an item,
Adding Kits to Economy
Creating the Kit
Before we delve too much into how to add the kit into the store, we first need to create the kit and install it into the GPortal server, there are currently 2 options to do this, one is the traditional command method, the 2nd is using the VereTech Kit Wizard which is free to use on our Discord, please click here if you haven't yet joined us.
For information purposes, we will now cover both kit installation methods.
Creating Kits in GPortal
To create a kit in GPortal you need a string of commands which together tells GPortal a number of things, the name of the kit, the item your placing into the kit, the quantity, the condition, and finally the placement of the item, please see below an example of a kit line;

It may seem confusing, but let's break this down.
kit - we always start with the word "kit" as this is telling the Gameserver exactly what we are intending to do.
add - The word "add" tells GPortal that we are adding a kit, or adding to an existing kit.
fullmetal - The word fullmetal is the name of the kit, there are certain limitations on what you can do with the name, please refer to D11 notation which should contain information on these limitations.
rifle.ak - This is the shortname, shortnames for all items can be acquired by clicking here. Please make sure you use the "short-code" names else it will not work.
2 - This is the quantity, this number doesn't have a known limit, however it would be a waste if it exceeded your players capacity as they just won't spawn. In this instance we will be getting 2 of this item.
1 - The 2nd numerical in this code is the condition of the item which ranges from 0 to 1 in 0.1 intervals, the lower the number, the lower the condition, by using 1 we are telling the server we want a brand new item.
Belt - This final one is the placement, there are currently 3 options for this, Belt - being the player hot-bar on screen, Main, being the players inventory and lastly, Wear, the Wear bracket is used for clothing so that it spawns directly on the player.
So this entire example is showing; Add a kit named fullmetal, or add to it if the kit name "fullmetal" is taken, and we want to add 2 brand new AKs that spawn in our hot-bar.
To add further items we simply repeat the process using the same name for the kit, in this instance "fullmetal".
Using VereTech Kit Wizard
----------------------------------------COMING SOON-----------------------------------------------
As mentioned before the only way to obtain access to the Kit Wizard is to be present in the VereTech Discord, in case you missed it, you can join us by clicking here.
The process is pretty simple, you use the command /kit in the kit building channel in our discord, please see below for the example;
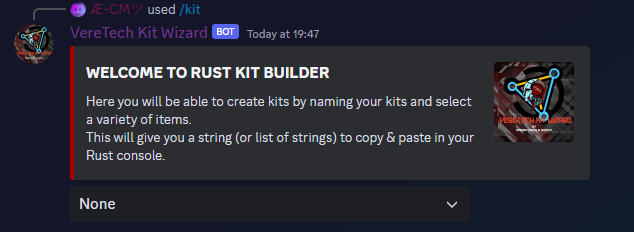
Once you have this command typed, hit enter and the Kit Wizard will guide you through the entire process of building the kit, because you are using this for the store please select "None" in the user selection.
When you approach the end you will be asked "Add Another Item" or "Build My Kit" please choose as appropriate, see the example below;
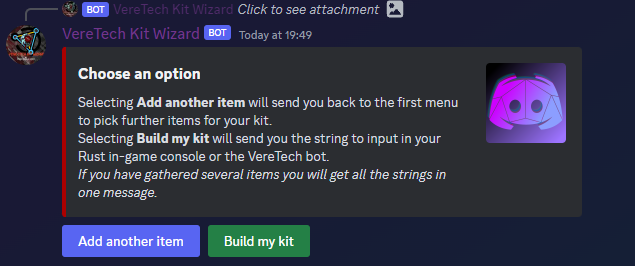
Should you be complete at this stage, please choose the "Build My Kit" option, once the kit is build you will be greeted with 2 options, the "Kit Install Code" and "Command Lines", for this demonstration we will only be interested in the "Kit Install Code" please see below;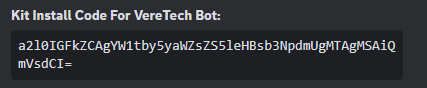
This code can be directly installed into the bot, saving you having to enter multiple lines one by one into the GPortal console. You will also see that we have designed the bot to give you a direct copy any paste button to avoid any mistakes on the next part.
Installing Kits using the Kit Code
Now that we have our code from the "Kit Wizard" we can install it directly into GPortal from the comfort of Discord, using the bot. To install the code we need to use the command /installkit you will be asked which GameServer you wish to install the kit code into followed by a text box which you will need to paste the code into, please see the image below for an example;
Simply paste the code, and hit enter. You have now successfully installed a kit ready for use in the Economy.
Adding the Kits to the Store
Now that you have compiled your kits, its time to add them to the store, the process is very similar to adding an item with a few minor differences, so lets go through them!
Using the command /product add-kit we can initiate the process of adding kits into the store. As you will see in the image below, we have up to 9 customizable options, these aren't all mandatory except the initial 4 which are;
Mandatory Options
Category - Please select which category you wish for this item to be placed in.
Name - Please name the item - This is personalized and is not referring to the item name, if selling a full metal kit then perhaps name it Full Metal Kit
Price - You will need to price this item accordingly within your store.
kit - This text box must contain the actual kit name, this is the 3rd string in the command if build through GPortal "fullmetal" or the name you selected when building it through the VereTech Kit Wizard..
Optional Options
Gameserver - If you select a gameserver here players will only be able to purchase this product on that 1 gameserver and it will not show if other game servers are selected.
server-cooldown - You can specify that only one player can buy this and then a cool down timer is enabled at your required length. (Must be whole number and time is in seconds)
player-cooldown - You can specify after a player has purchased the item, how long he then has to wait to purchase it again, this will not affect any other players ability to buy this product. (Must be whole number and time is in seconds)
position - You can adjust the order in which these items appear in your store by clicking this menu, starting at 0
eg; 0=1st, 1=2nd, 2=3rd, 3=4th ect...
delivery-delay - You can specify how long after the item is purchased it takes to receive delivery, this can be extremely useful if they are experiencing a raid, it will stop them instantly sealing constantly using the shop to buy doors ect.
(Please enter whole numbers and time is in seconds).
Role - You can specify which Discord role is allowed to see this kit. Please Note: Being the Discord owner does not give you automatic immunity to this rule, please ensure as owner you have every role available within your Discord.
Please see the example below for further information;

Once we choose out parameters, hit send and the product will be added. To check this kit, simply use the command /buy as before in the previous page.
Editing a Kit
Should you require it, you also have the option to edit a Kit, you can do this using the command /product kit-edit, using this command you will have the same options as before for editing, you will simply have to select which parameters you wish to edit, or even add. Please see the image below;
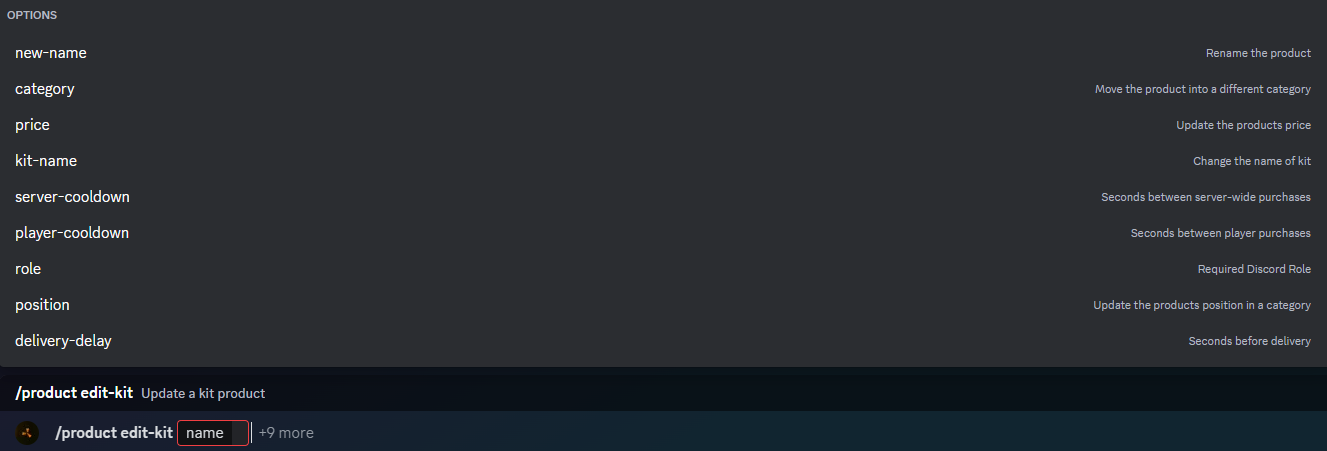
Obviously with editing, because the kit exists inside your store, there are no longer "Mandatory" edits as it already has all the information it needs to be in your store.
Once the command is sent following any changes, you will receive the following response from the bot, please accept this as confirmation of your changes.
Clearing Cooldowns on Kits
Following certain actions, for example wipes, there comes a time when we require a method to clear all cooldowns for products in the store. Using the command /eco clear-cooldown we can do this. Following triggering this command we have 2 options;
Category - Please select the category which you wish to clear the cooldowns from.
Product - Please select the category which you wish to clear the cooldowns from.
If you leave BOTH options BLANK - The entire shop will have all cooldowns wiped.
If you select CATEGORY and leave product BLANK, all items within that category will have cooldowns wiped.
If you select PRODUCT and leave category BLANK, Only the specified product will have cooldown wiped.
If you select BOTH, only the specified product will have cooldown wiped.

Deleting a Kit
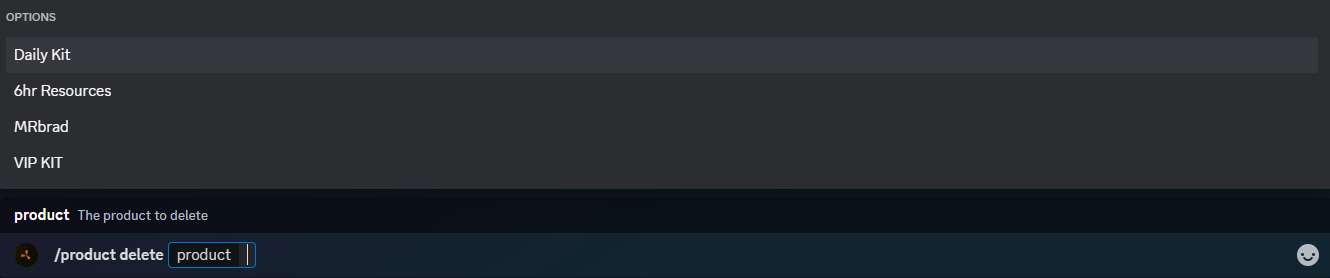
From time to time you may wish to mix up the contents of your shop, there are a number of ways to do this including removing items you no longer want there. To do this please use the command /product delete, this command will then send you a list of your products to select which one you want to delete, in the event you have too many items in the store, please start to type the name into the text box for it to shortlist with autocomplete. Please see the example below;

Once you select your kit to delete, simply hit send and the bot will remove the kit. You will be notified with a response acknowledging your request and it's success.
Adding Command Groups To Economy
Adding Commands to a Category
Adding commands to your store opens up endless opportunities for your players. This allows you the opportunity for players to purchase Daytime, Purchase a Airdrop Spawn on the map etc.
Before we get started we will need to create a command group and add the command/commands to it. To do this checkout the guide here. Just to clarify when this product is purchased we will execute EVERY command in that command group.
To get started you will need to use the command /product add-cmd, much like creating a kit or an item for the store you will be greeted with a number of parameter options, please see the image below;
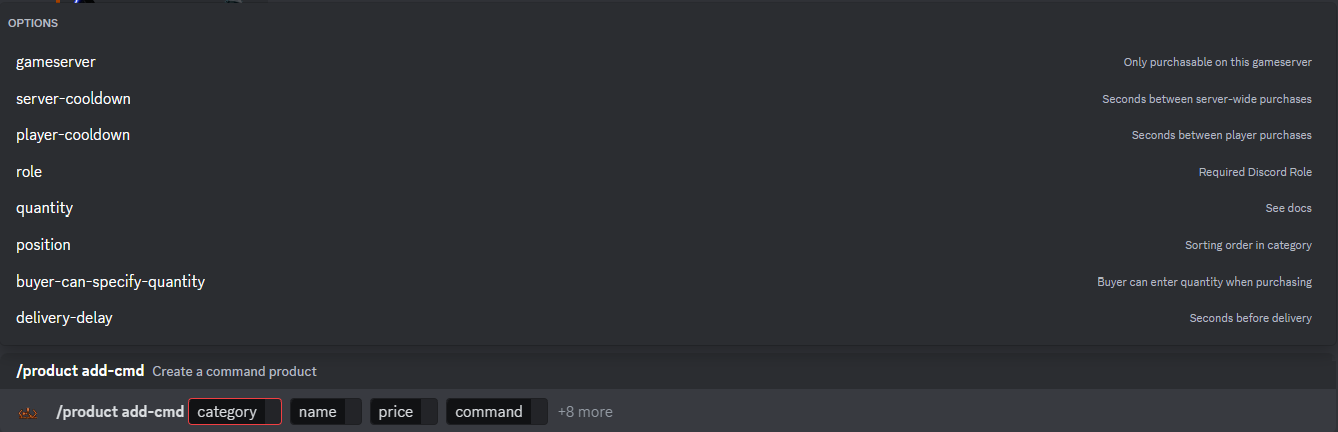
It is important to note that we have 4 mandatory fields and a further 8 optional, again, you will probably recognize this from adding the previous 2 options to the store, but we will again break them down,
Mandatory Options
Category - Please select which category you wish for this item to be placed in.
Name - Please name the item - A location is a good name to call it.
Command - This is where you select the command group you created earlier.
(Note only commands you can run from the Web console will work here.)
Optional Options
Gameserver - If you select a gameserver here players will only be able to purchase this command on that 1 gameserver.
Server-cooldown - You can specify that only one player can buy this and then a cool down timer is enabled at your required length. (Must be whole number and time is in seconds)
Player-cooldown - You can specify after a player has purchased the item, how long he then has to wait to purchase it again, this will not affect any other players ability to buy this product. (Must be whole number and time is in seconds)
Role - You can specify which Discord role is allowed to see this item. Please Note: Being the Discord owner does not give you automatic immunity to this rule, please ensure as owner you have every role available within your Discord.
Price - You will need to price this item accordingly within your store.
Position - You can adjust the order in which these items appear in your store by clicking this menu, starting at 0
eg; 0=1st, 1=2nd, 2=3rd, 3=4th ect...
Delivery-delay - You can specify how long after the item is purchased it takes to run the command.
(Please enter whole numbers and time is in seconds).
Placeholders Options
You may be asking but how do I add playernames and specified quantity. These work very much like customising feeds covered in Customising Feeds.
|
Placeholders |
Description |
Example |
| {PlayerPositionX} | Produces the X axis position of the player |
24.5 |
| {PlayerPositionY} |
Produces the Y axis position of the player | 225.6 |
| {PlayerPositionZ} |
Produces the Z axis position of the player | -114.3 |
| {PlayerPositionNorthX} | Produces the X axis position of the player 1M north of the position. |
25.5 |
| {PlayerPositionNorthY} | Produces the Y axis position of the player 1M north of the position. | 226.6 |
| {PlayerPositionNorth Z} | Produces the Z axis position of the player 1M north of the position. | -113.3 |
These could be implemented in the example below
entity.spawn recycler_static {PlayerPositionX},{PlayerPositionY},{PlayerPositionZ} (This command will cause a recycler to spawn on the players position.
This concludes adding commands to your store. It is very important you test these before announcing their sale to avoid any problems when players use it.
Clearing Cooldowns on CMDs
Following certain actions, for example wipes, there comes a time when we require a method to clear all cooldowns for products in the store. Using the command /eco clear-cooldown we can do this. Following triggering this command we have 2 options;
Category - Please select the category which you wish to clear the cooldowns from.
Product - Please select the category which you wish to clear the cooldowns from.
If you leave BOTH options BLANK - The entire shop will have all cooldowns wiped.
If you select CATEGORY and leave product BLANK, all items within that category will have cooldowns wiped.
If you select PRODUCT and leave category BLANK, Only the specified product will have cooldown wiped.
If you select BOTH, only the specified product will have cooldown wiped.

Adding Teleportation to Economy
The final type of item we have for the store is the teleportation product, this allows your users to purchase one time teleportation to your chosen locations, maybe its one of the many Safe Zone monuments for instant protection, could be an instant start to either Oil Rigs or even an instant jump to the Bradley APC. Whatever it may be, the power is in your hands!
Obtaining Coordinates
To create a teleportation we will need some co-ordinates from in-game. Please load into your server and fly over to your desired location (Slightly float above ground, standing on the ground for this part risks players falling through the map).
Now open your admin panel in game and head over to the commands tab, when your there press X (Xbox) or Square (Playstation) this then brings up your on-screen keyboard. In this text box, please type the command printpos and hit enter. You will see that the log files open with a response to X, Y and Z values, please make a note of these... See the image below for the 3 numbers you are looking for;
These are know as the X, Y and Z values (in that order) we will need this when we come to create the teleport.
Creating the Teleport Product
To create the teleport product we will need the coordinates mentioned above, to add these to the store we will need the command /product add-tp. Much like creating a kit or an item for the store you will be greeted with a number of parameter options, please see the image below;
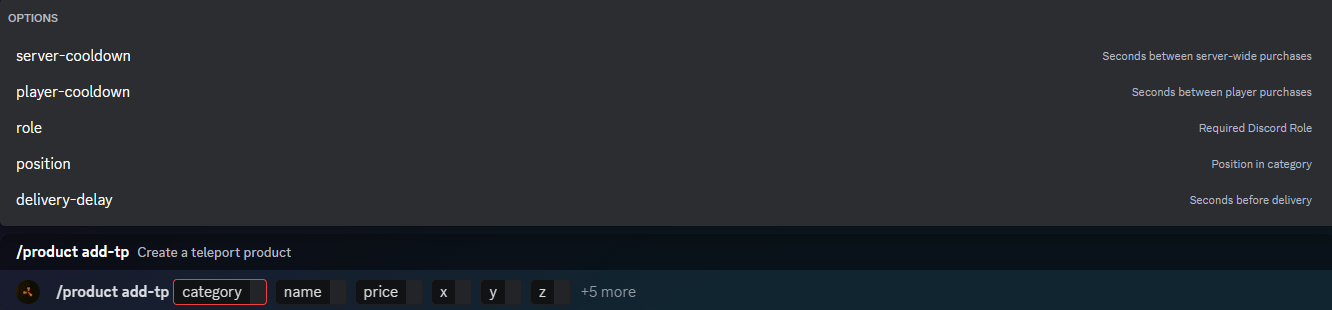
It is important to note that we have 6 mandatory fields and a further 5 optional, again, you will probably recognize this from adding the previous 2 options to the store, but we will again break them down,
Mandatory Options
Category - Please select which category you wish for this item to be placed in.
Name - Please name the item - A location is a good name to call it.
Price - You will need to price this item accordingly within your store.
x, y & z - These are the coordinates you gained earlier from using printpos - Please enter them in here in the same order as they appeared including any and all decimal places.
Optional Options
server-cooldown - You can specify that only one player can buy this and then a cool down timer is enabled at your required length. (Must be whole number and time is in seconds)
player-cooldown - You can specify after a player has purchased the item, how long he then has to wait to purchase it again, this will not affect any other players ability to buy this product. (Must be whole number and time is in seconds)
position - You can adjust the order in which these items appear in your store by clicking this menu, starting at 0
eg; 0=1st, 1=2nd, 2=3rd, 3=4th ect...
delivery-delay - You can specify how long after the item is purchased it takes to receive delivery, this can be extremely useful if they are under attack whilst out farming or trying to re-counter a monument.
(Please enter whole numbers and time is in seconds).
Role - You can specify which Discord role is allowed to see this item. Please Note: Being the Discord owner does not give you automatic immunity to this rule, please ensure as owner you have every role available within your Discord.
This concludes adding teleportation to your store. It is very important you test these before announcing their sale to avoid any problems when players use it.
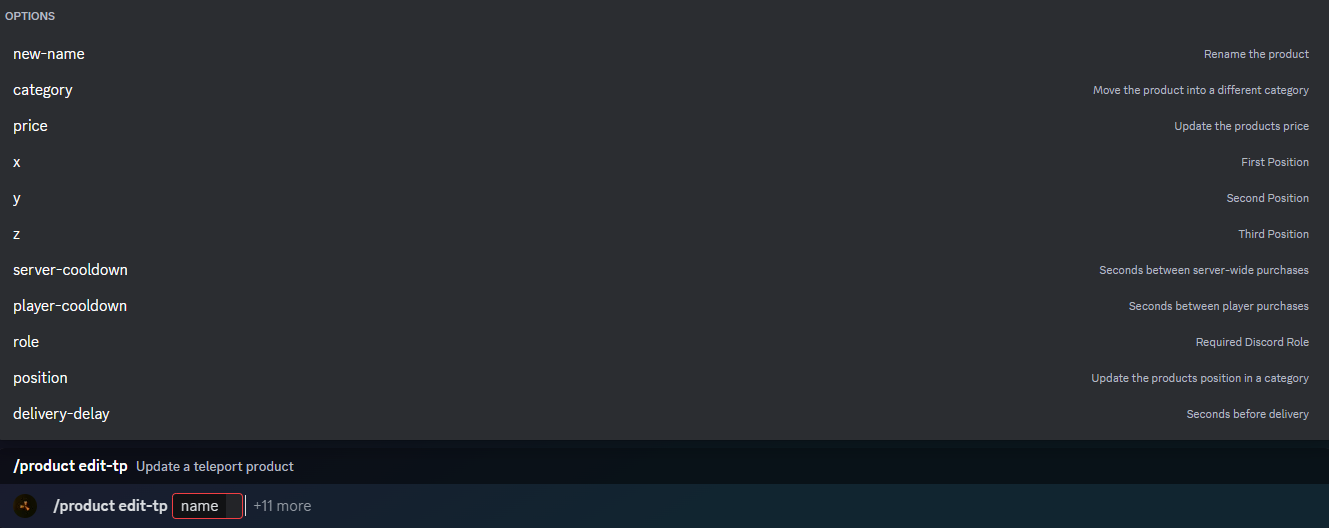
Editing the Teleport Product
Editing is much the same as editing everything else within economy however the command is different, for teleports please use /product edit-tp. It will allow you to edit every and all options should you require, please see below the example of the response;
Clearing Cooldowns on Teleports
Following certain actions, for example wipes, there comes a time when we require a method to clear all cooldowns for products in the store. Using the command /eco clear-cooldown we can do this. Following triggering this command we have 2 options;
Category - Please select the category which you wish to clear the cooldowns from.
Product - Please select the category which you wish to clear the cooldowns from.
If you leave BOTH options BLANK - The entire shop will have all cooldowns wiped.
If you select CATEGORY and leave product BLANK, all items within that category will have cooldowns wiped.
If you select PRODUCT and leave category BLANK, Only the specified product will have cooldown wiped.
If you select BOTH, only the specified product will have cooldown wiped.

Setting Role Specific Economy Items & Kits
Creating the Roles
Setting role specific items in the store is a great way to give your VIPs, or anyone else for that matter, a way to be rewarded, from adding improved daily free kits, to adding their specific version of items in the store with granted discount or even to give some items VIP access only. The possibilities are truly as big as your imagination.
To do this we will need to set some roles in Discord. To do this head over to server settings, select roles and then click the "Create Role" button. Please name these appropriately as you will need them later, please see image below to show you what you're looking for;

Repeat this process as many times as you need to.
Creating Role Specific Items
Now that we have the roles set we can start to engage with the VereTech RCE Bot.
Start off by using the command /product add-item, see below;
and follow the process as normal when adding an item, if you need assistance with this then please click here to learn more, alternatively if you have added an item which you wish to change to a role specific, you will instead use the command /product edit-item and select the "Role" selection from the menu, here you can choose your dedicated roles, please see below;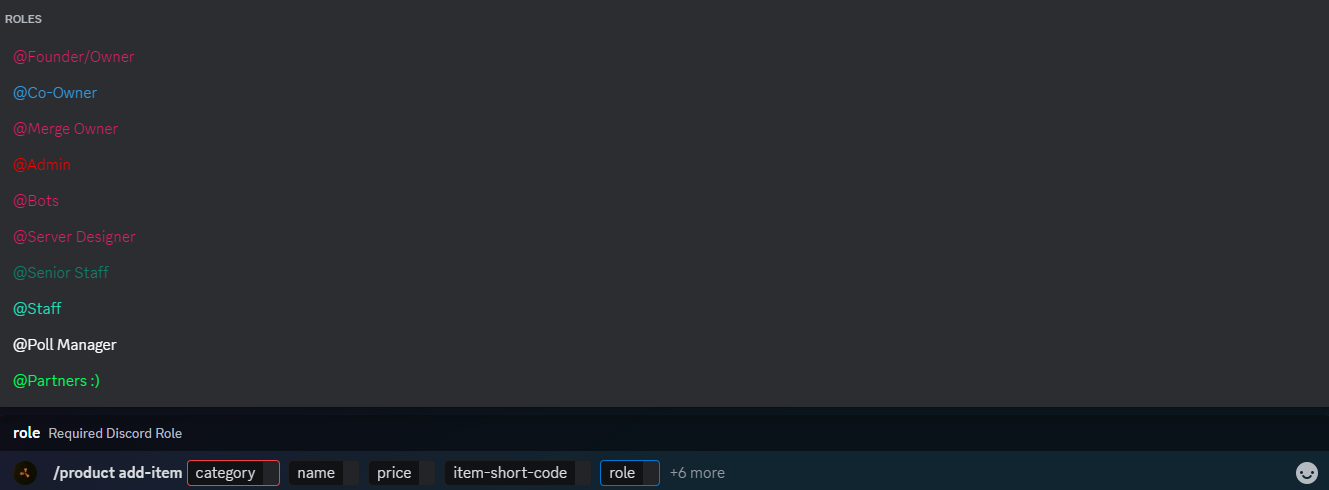
Check your Store
Once you have added any role specific items, to test these you will require to give yourself all of the new roles, even as server owner you will not have immunity to the role specific items, you must have the roles.
To carry out the test please use the command /buy to trigger the store, you will then be able to see all of your items and their permission levels, please see below of an example;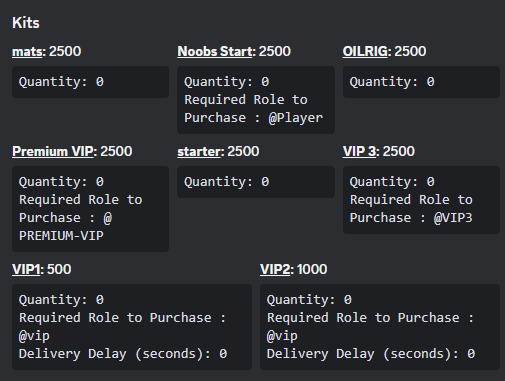
This will be an identical process for creating Role specific kits. For more information on kit building, please click here.
Player Wallets, Balances, Rewards and Logs
Within the economy, players will need a wallet and a balance to be able to spend within your store, accompanied with a way to also earn. This chapter will now focus on everything player funds and balances.
Players Must be linked using the /link command, more information can be found on this by clicking here.
Setting the Starting Balance
Setting the starting balance isn't necessarily a must do, however, we appreciate that it can be disheartening to players starting on 0. To challenge this we have introduced a way to give your players a little head start with their wallets. To configure this we will use the command /eco startbal, It is a pretty simple module to understand, the hard bit lies with creating a well balanced economy system. Please see below the image that shows how to set the starting balance;

Simply enter your desired value and hit send to set the balance.
Setting your Currency
We have enabled owners to set the name of your currency, you can even add custom emojis! I mean hey.... it's your economy right? To do this all you have to do is use the command /eco currency. See below for a snapshot of the command;

Giving Players Money
We all know that being able to give players money is a massive thing, this allows you to hold events, challenges or even just random giveaways. Lets get to it! The command for this feature is /eco give, This command allows you to choose the linked player or Discord role and then the amount to give, you can then have the choice of Wallet or Bank see below for details;

Taking Players Money
As great as it is to give money, we also have the option to take it, if its taking entry fees, removing a mistaken give or even punishment for an in game action? Whatever you reasons may be, the command for this is /eco take. Same again as above, please then select the player or Discord role followed by the amount you wish to take and where from;

Rewarding PvP Kills
Another great way for players to earn is to compete in-game, there is no default for this so it will require you to set it up before anything pays, using the command /eco reward-pvp, you will be asked which server you wish to apply this to followed by the amount, you then have 2 options, "Randomize" & "Steal".
Selecting randomize will mean your payment for PvP kills will be between 1 and your set amount, so if you set it at 200, each PvP kill will randomly be rewarded between 1-200 at complete random.
Selecting steal will mean that part or all of the payment for the reward will be made from the killed players Wallet: (Bank cannot be stolen from) - This allows players to earn and get paid automatically without admin intervention. Please see the image below for the example;

Rewarding PvE Kills
Should you also wish, we can set the payments to PvE kills, this is a great idea for the less confident fighters and even PvE only servers. The command is very similar to the PvP one, it is however, /eco reward-pve, you will again be greeted with identical options as before, select your GameServer followed by the amount. Kills only count for scientists, not animals.
You also have the option of randomize, Selecting randomize will mean your payment for PvE kills will be between 1 and your set amount, so if you set it at 200, each PvE kill will randomly be rewarded between 1-200 at complete random.

In-Discord Events
We also have an option in-Discord where events will appear in a selected channel with a claim button, please see the example below;

These events appear with a "Claim" button and must be claimed in time to get the reward, to configure the rewards the command we need is /eco reward-event, you will see upon triggering this command that it first asks you for the GameServer, followed by 4 optional events, Airdrop, Locked Crate, Attack Helicopter and Cargo - Each of this rewards can be more valuable than the other, or simply set to the same. Please see the options below;

Bandit Camp Spin Wheel
Another way for players to earn money to spend on your store is to gamble for it! We have re-created the roulette wheel that features in the almighty Bandit Camp! The pay-out multipliers are exactly the same. But there are a few variables with we can adjust and configure to stop it being abused. To configure the big wheel, the command is /eco bigwheel and you will see the following;
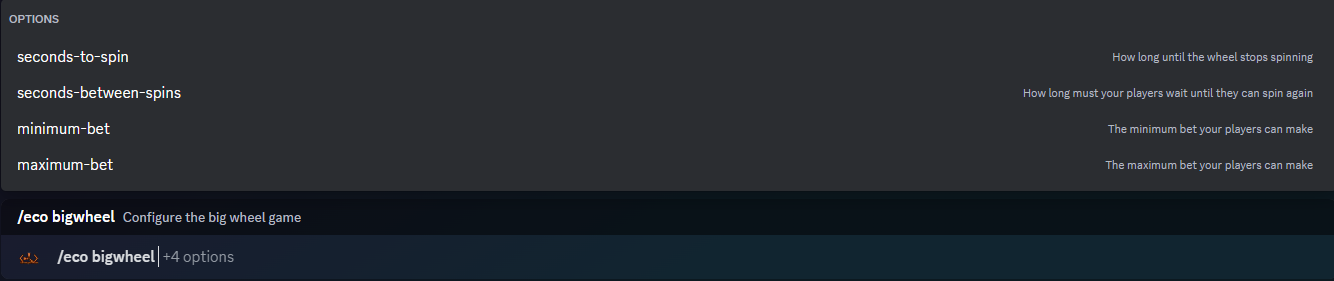
These 4 variables are as follows;
seconds-to-spin - Adjust the amount of time that the wheel is spinning before it comes to a halt and reveals the winning number
seconds-between-spins - This places a cool down on the spin wheel so that players cannot spam it, this allows you to maintain a level of control over their gambling habits.
minimum-bet Allows you to set a minimum bet on the spin wheel.
maximum-bet - Allows you to set a maximum bet on the spin wheel.
BlackJack
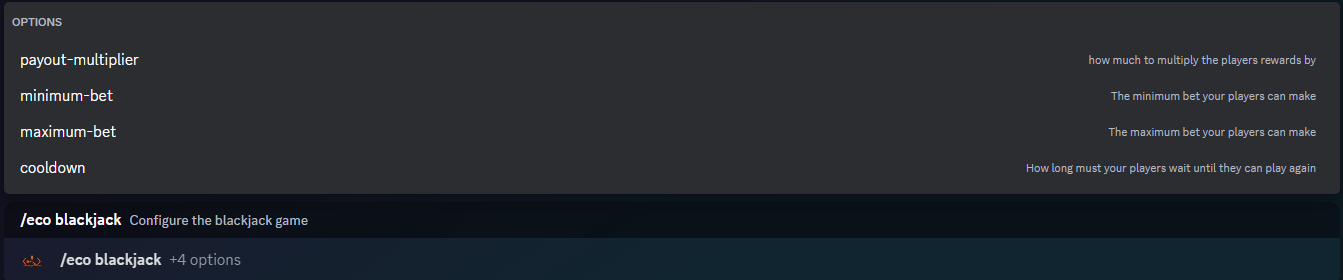
The final way for players to earn money to spend on your store is to gamble for it! We have added the popular card game, Blackjack. We can adjust the minimum and maximum bet amounts by using the command /eco blackjack please see the options in the image below;
Resetting
When the joy comes to wiping your server, a useful tool to have is a way to reset their balances to a certain number, weather that be 0 or back to your stated starting amount, you can give everyone an equal start following a wipe! To do this, use the command /eco setbal. Please see the image below for the example;

Economy Admin Logging
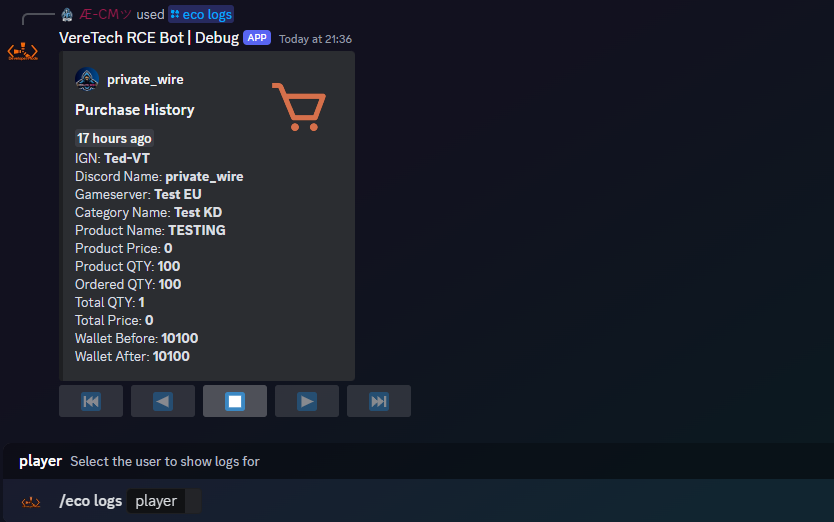
As great as it is to have all of these options at the tips of you fingers, it is also a great idea to be able to view the logs of the Economy system. You will have the option now to use the command /eco logs, doing so will give you an option to choose a player. Upon choosing, hit enter and the players purchase history will be displayed on screen.
Here you will be able to see pages of the previous history of that player, showing a "per page" break down. You will be allowed up to 10 purchases per page and 10 pages, allowing 100 in total. Please see below for the example;